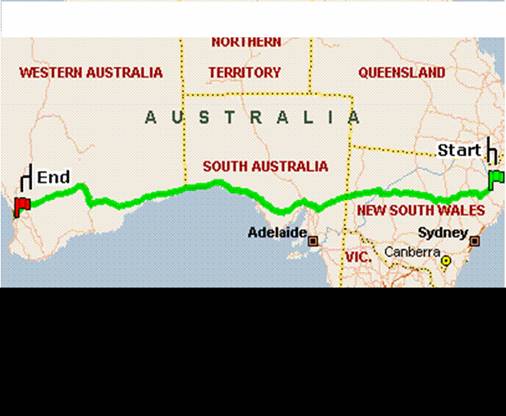
This is approximately the route Brian may follow across
Australia. I do not think the estimated journey time is quite correct for
a Bradford!
Brian Hehir reckons on 14 days.
|
|
Miles |
|
|
|
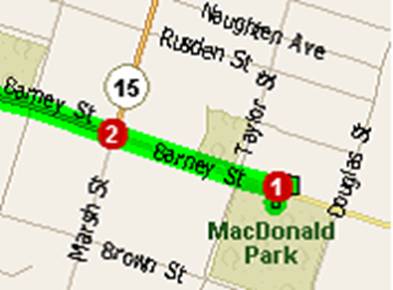
Start:
Depart Armidale, New South Wales, Australia on Local road(s)
(North) |
< 0.1 |
|
1:
Turn LEFT (West) onto
Barney St |
0.2 |
|
2:
Keep STRAIGHT onto 15 [Barney
St] |
0.2 |
|
|
|
|
|
|
|
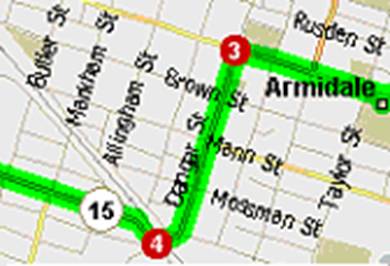
3:
Turn LEFT (South) onto 15 [Dangar
St] |
0.6 |
|
4:
Turn RIGHT (North-West) onto 15 [Kentucky
St] |
68.3 |
|
|
|
|
|
|
|
5:
Turn LEFT (South-West) onto 15 [New
England Hwy] |
0.6 |
|
6:
Keep STRAIGHT onto 34 [Bridge
St] |
0.8 |

|
|
|
|
|
|
|
7:
Keep STRAIGHT onto 34 [Werris
Creek Rd] |
0.4 |
|
8:
Turn LEFT (East) onto Local road(s) |
0.1 |
|
9:
Turn LEFT (West) onto 34 [Oxley
Hwy] |
0.3 |

|
|
|
|
|
|
|
10:
Turn RIGHT (North) onto Local road(s) |
< 0.1 |
|
11:
Bear LEFT (West) onto Local road(s) |
< 0.1 |
|
12:
Turn RIGHT (West) onto 34 [Oxley
Hwy] |
45.1 |
|
|
|
|
|
|
|
13:
Turn RIGHT (North-West) onto
Conadilly St |
0.1 |
|
14:
Turn LEFT (South-West) onto 34 [Oxley
Hwy] |
0.3 |
|
15:
Turn RIGHT to stay on 34 [Oxley
Hwy] |
0.7 |
|
|
|
|
|
|
|
16:
Turn RIGHT (North) onto Local road(s) |
< 0.1 |
|
17:
Bear LEFT (West) onto Local road(s) |
< 0.1 |
|
18:
Turn RIGHT (West) onto 34 [Oxley
Hwy] |
123.8 |
|
|
|
|
|
|
|
19:
Turn RIGHT to stay on 34 [Oxley
Hwy] |
53.1 |
|
|
|
|
|
|
|
20:
Turn RIGHT to stay on 34 [Oxley
Hwy] |
0.2 |
|
21:
Road name changes to
Burton St |
0.1 |
|
|
|
|
|
|
|
22:
Turn LEFT (South) onto
Oxley Hwy |
< 0.1 |
|
23:
Turn LEFT (South-West) onto
Burton St |
0.2 |
|
|
|
|
|
|
|
24:
Road name changes to 34 [Oxley
Hwy] |
11.4 |
|
|
|
|
|
|
|
25:
Road name changes to
Warren St |
0.5 |
|
26:
Turn RIGHT (West) onto 32 [Trangie
St] |
0.3 |
|
|
|
|
|
|
|
27:
Road name changes to 71 [Mitchell
Hwy] |
35.8 |
|
|
|
|
|
|
|
28:
Keep STRAIGHT onto
Mitchell Hwy [Nymagee St] |
0.6 |
|
29:
Turn LEFT (South) onto
Mitchell Hwy [Moonagee St], then immediately turn RIGHT
(North-West) onto 71 [Mitchell Hwy] |
0.7 |
|
|
|
|
|
|
|
30:
Keep LEFT onto 32 [Barrier
Hwy] |
350.5 |
|
|
|
|
|
|
|
31:
Road name changes to
Barrier Hwy |
1.6 |

|
|
|
|
|
|
|
32:
Road name changes to 32 [Barrier
Hwy] |
12.5 |
|
|
|
|
|
|
|
33:
Turn RIGHT (North-West) onto
Barrier Hwy [Iodide St] |
0.8 |
|
34:
Turn LEFT (South-West) onto
Barrier Hwy [Williams St] |
0.1 |
|
|
|
|
|
|
|
35:
Turn LEFT (South) onto
Williams St |
< 0.1 |
|
36:
Turn LEFT (South-West) onto
Barrier Hwy [Williams St] |
0.4 |
|
|
|
|
|
|
|
37:
Turn LEFT (South) onto
Williams St |
< 0.1 |
|
38:
Turn LEFT (South-West) onto 32 [Barrier
Hwy] |
0.1 |
|
39:
Turn LEFT (South) onto
Williams St |
< 0.1 |
|
|
|
|
|
|
|
40:
Turn LEFT (South-West) onto 32 [Barrier
Hwy] |
0.7 |
|
41:
Turn LEFT (South) onto Local road(s) |
< 0.1 |
|
|
|
|
|
|
|
42:
Bear RIGHT (South-West) onto Local road(s) |
< 0.1 |
|
43:
Turn LEFT (South-West) onto 32 [Barrier
Hwy] |
166.0 |
|
|
|
|
|
|
|
44:
Entering
South
Australia |
|
|
|
|
|
|
|
|
45:
Turn RIGHT (West) onto
Orroroo Peterborough Rd |
9.3 |
|
|
|
|
|
|
|
46:
Turn RIGHT to stay on
Orroroo Peterborough Rd |
14.7 |
|
47:
Road name changes to
Orroroo Jamestown Rd |
5.6 |
|
|
|
|
|
|
|
48:
Road name changes to
Wilmington Orroroo Rd |
32.5 |
|
|
|
|
|
|
|
49:
Turn RIGHT (North) onto
Main North Rd |
14.5 |
|
50:
Turn RIGHT (North) onto 1 [Princes
Hwy] |
14.4 |

|
|
|
|
|
|
|
51:
Keep LEFT onto
Eyre Hwy |
0.1 |
|
52:
Keep STRAIGHT onto 1 [Eyre
Hwy] |
5.9 |
|
|
|
|
|
|
|
53:
Road name changes to ALT1 [Eyre
Hwy] |
9.0 |
|
54:
Turn RIGHT (West) onto 1 [Eyre
Hwy] |
80.6 |
|
|
|
|
|
|
|
55:
Turn LEFT to stay on 1 [Eyre
Hwy] |
55.0 |
|
|
|
|
|
|
|
56:
Turn RIGHT (North-West) onto
Tod Hwy |
0.4 |
|
57:
Road name changes to 1 [Eyre
Hwy] |
77.6 |

|
|
|
|
|
|
|
58:
Stay on 1 [Eyre
Hwy] |
61.0 |
|
|
|
|
|
|
|
59:
Turn RIGHT to stay on 1 [Eyre
Hwy] |
745.8 |
|
|
|
|
|
|
|
60:
Entering
Western Australia |
|
|
|
|
|
|
|
|
61:
Turn RIGHT (West) onto
Eyre Hwy |
0.4 |
|
62:
Turn RIGHT (North) onto
Coolgardie Esperance Hwy |
102.0 |
|
|
|
|
|
|
|
63:
Bear LEFT (West) onto 94 [Great Eastern Hwy] |
147.7 |
|
|
|
|
|
|
|
64:
Road name changes to
Great Eastern Hwy |
3.9 |
|
|
|
|
|
|
|
65:
Road name changes to 94 [Great
Eastern Hwy] |
128.5 |
|
|
|
|
|
|
|
66:
Turn RIGHT to stay on 94 [Great
Eastern Hwy] |
5.5 |

|
|
|
|
|
|
|
67:
Turn RIGHT to stay on 94 [Great
Eastern Hwy] |
11.7 |
|
68:
Stay on 94 [Great Eastern Hwy] |
35.6 |

|
|
|
|
|
|
|
69:
Keep LEFT onto Ramp [Roe
Highway Exit] |
0.1 |
|
70:
Bear LEFT (South) onto 3 [Roe
Hwy] |
7.3 |
|
|
|
|
|
|
|
71:
Turn LEFT (South-East) onto 4 [Tonkin
Hwy] |
7.1 |
|
72:
Merge onto Ramp [Albany
Highway on Ramp] |
0.1 |
|
|
|
|
|
|
|
73:
Keep STRAIGHT onto 30 [Albany
Hwy] |
4.7 |
|
74:
Road name changes to 20 [S
Western Hwy] |
1.3 |
|
|
|
|
|
|
|
75:
Bear RIGHT (South-West) onto Local road(s) |
0.1 |
|
76:
Bear LEFT (East) onto Local road(s) |
< 0.1 |
|
77:
Turn LEFT (North) onto 20 [S
Western Hwy] |
0.5 |

|
|
|
|
|
|
|
78:
Turn LEFT (West) onto Local road(s) |
0.1 |
|
79:
Turn RIGHT (North) onto Local road(s) |
< 0.1 |
|
End:
Arrive Armadale, Western Australia, Australia |
|
|
|
|
|